

AVAILABLE SERVICES FROM START TO FINISH
GETTING STARTED:
DESIGN REVIEW
Custom Castings' process begins with a casting design review with the customer regarding considerations for molding, manufacturing and subsequent processes. Depending on which foundry process is used there are many pattern making and tooling concerns that customers will have. This review is the first step in the quoting process for any casting project.
During this process an overview of a project would provide detail necessary to develop a production plan that would result in meeting the customer's requirements. Custom Castings of Vermont's capabilities are discussed and a decision made as to whether the project moves forward to quote or is referred to another shop for the benefit of the customer's creative needs.
Open dialogue is always beneficial throughout and any confidentiality concerns can be met by written agreement, if necessary.
MASTER PATTERN
The master for any casting project is the first consideration. Whether the lost wax process or sand casting is expected, the master pattern will need to exist. A sculpture or other provided pattern is one of the options. Another is a conceptual idea that needs to be turned into a pattern. Electronic design files are commonly produced either from scratch using a program, such as Solidworks, or a model can be scanned into one of these programs and a machining file developed. Patterns provided can move to mold making directly or after some degree of preparation. Electronic files and machining are a subcontracted task.
There are several pattern shops that would be considered. Each has the capability to produce quality production ready patterns or separate master patterns. Depending on the project, a review would be necessary prior to the machining stage and then again after the master pattern is produced but before mold making begins.

MOLD MAKING
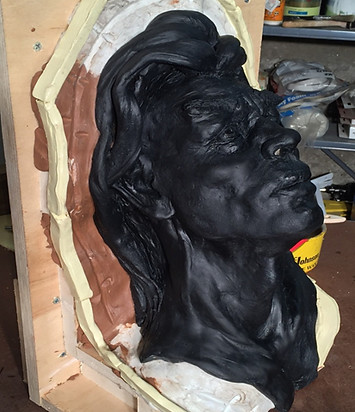
One of the first steps in producing the casting is the mold. In the investment casting process (lost wax), this will be typically a flexible rubber mold that is backed up with a rigid shell or mother mold. There are a variety of materials to consider and all comes down to the specifications of the final product. Rubber molds are suitable for a number of casting materials such as wax, plaster, plastic and even concrete. Whether the casting material is the final product or the next step in the investment process, the quality of the rubber mold is critical. Consideration is given to all aspects of the future use of the mold. The rubber mold will become the means to reproduce anywhere from one to hundreds of castings. Every effort is used to achieve success in duplicating the master exactly with little or no modifications. Close communication and review with the customer is necessary during the mold planning phase.
Accuracy in molding is achieved by close review of the master. The master or original is the piece that is going to be molded. Parting lines are established and a mold construction plan is developed. After a review of the master, the final design could be a one-piece rubber mold or a mold of multiple pieces that will need to be assembled for casting and disassembled for de-molding. Registration keys are made into the rubber molds and ensure that alignment of the molds and support shells can be achieved accurately.
In the case of a sand casting, the mold is made by using a master pattern mounted on a follow board. The pattern is put into a frame that will hold the molding sand. The sand is rammed against the pattern to produce a dense and compact sand mold. There are two halves necessary to the first half will be flipped over and the follow board removed. This will leave the master pattern embedded in the first half. The second frame is put onto the first frame and the second sand mold produced. The two halves are then separated and the pattern is carefully removed. The gating system is then cut into the molding sand and vents added to the mold. The two halves will be put back together. There are locating pins that will ensure that the halves are located properly. The two halves are clamped together and the molten metal is poured. The metal is allowed to cool in the mold for a determined amount of time. Once cool the mold is opened and the casting is shaken out of the mold. The casting is now ready for cleaning, inspection and finishing.


CASTING INTO THE
RUBBER MOLD
At this point the rubber mold has been produced, cleaned, assembled and prepared for the casting material. Pouring wax in the rubber mold will be the next step to produce a metal casting. A determination is made earlier in the process as to whether the part is going to be cast solid or is intended to be hollow. Various techniques are used to apply wax to achieve the desired casting thickness. Once the wax is cast and hardened, the piece is de-molded. The wax pattern is now removed, inspected and prepared for the next step, which is gating. At this point it is time to meet with the customer or artist. This wax pattern will become the cast metal piece so it is important to make sure everything is set. Wax chasing is a process where any imperfections in the wax, blending of parting lines and perhaps some final detailing can still be done. Depending on the type of casting being produced this can either be done by the foundry or by the customer.
Casting in other materials is another possibility. There are many materials to choose from that are suitable for both indoor and outdoor applications. In addition, there are colorations and surfacing processes that can enhance a piece. Cold casting is a process where metal powder is added to plaster or plastic. The metal powder, such as bronze or nickel, can be polished and buffed to give the appearance of an actual cast piece.

GATING
The next step toward producing a metal casting is adding the gating system. In lost wax process, the gating system is made of the same or similar wax from which the pattern is made. The gating is the route that the metal will take to fill the mold. Proper feeding of the casting is necessary to avoid pouring defects in the final casting. Special attention to the geometry of the system and the placement of the in-feed gates on the casting will determine how the metal gets into the mold and then later what needs to be removed and cleaned up after the metal is poured.

INVESTMENT
At this stage the wax pattern and gating system are ready for a coating of ceramic slurry and refractory sand. A fine mesh material is layered on first, followed by a coarser material and then a final dip into a binder material. The fine mesh will allow the mold to capture the intricate detail of the pattern and is the finish coat. The coarser back up material adds support for this finish coat. The slurry and refractory sand is added in layers until the desired mold thickness is achieved. Each layer is allowed to dry sufficiently before the next is applied. This coating will become the ceramic shell that the metal is poured into once all of the wax is removed.


WAX MELT OUT
Once the shell is completely dry, the wax must be melted out. There are a number of methods to remove the wax. Custom Castings of Vermont has come to prefer submerging the shell into boiling water. Nearly 100 percent of wax pattern melts out leaving a clean shell. The wax is will float on the water bath so that when the heat is removed the wax solidifies and can be lifted out of the tank and reused. The shell is lifted out of the tank and set aside to dry.

FIRING THE SHELL
The shell is next loaded into a kiln where a complete dry out and high temperature firing will occur. The firing cycle is controlled to bring the shell up to 1,500 to 1,800 degrees Farenheit. The fired shells are hard and strong and can be cooled down, inspected, stored for later or can be returned to the kiln.


METAL CASTING
A gas fired crucible furnace is used to melt the metal that will be cast into the shell. There are several crucible sizes depending on the size of the casting or the metal being poured. The metal is heated in the crucible at a controlled rate until the proper pouring temperature is obtained. When the metal is ready, the shells will be pulled directly out of the kiln while at temperature and set into a bed of fine sand. The sand will support the shell for pouring. Once the shells are in place the crucible is lifted out of the furnace, dross is removed from the top of the molten metal, and the metal is poured into each of the shells. A clean shell, proper pouring temperature, and the correct pouring rate is necessary to produce a quality casting. The metal is poured and allowed to cool in the shell for a predetermined amount of time. As the casting cools, the metal contracts and the shell material will begin to fall away.

FINISHING
In the earlier stages of making the molds for a project the finishing of the castings would have been discussed. A plan would have been developed that dictated where the in-gates would be placed and most likely what finishing process would be pursued. It is at this stage that another review of the casting would be wise. Final chasing of the metal, blending of any grinding marks left from removing the gates, and making the final plan for finishing is important. There are many possible steps to address the final surface finish. Surface finish can be minimal as cast or will involve sand blasting, perhaps blasting with glass beads, polishing and buffing or a combination of any or all.
Larger or even small complex pieces can be cast in sections and then welded together. The joints then are blended and finished.
PATINA
A variety of methods are available to add a patina to the surface. The patina will affect the color and appearance of the metal. There are many colors that can be applied hot or cold. More typical is the method of heating the metal and applying the chemical. Patinas can be used singularly or in combination with other patina effects. Once the patina is applied there are protective coatings that can be used. Various wax or sealers can be used to improve the appearance and provide protection from the environment.


MOUNTING
Final installation may involve mounting the piece to a base material for display. The base can be wood, stone or concrete that would be used to install the piece in some setting. The casting would be prepared for whatever mounting technique was determined necessary.
PACKAGING AND SHIPPING
A completed project will require some sort of packaging or crate in order to handle properly for shipping or even pick up. Depending on the circumstances, a plan for packaging would be included in the initial discussions and quote.
